Advantix Vario end closing piece
Product information
Advantix Vario end closing piece
for extension
| Year built (from): | 4.6.2014 |
Trade mark rights exist for this document, further information can be found at www.viega.com/legal-notices.
Target groups
The information in this instruction manual is directed at the following groups of people:
Heating and sanitary professionals and trained personnel
HVAC professionalsTilers
Tilers
It is not permitted for individuals without the abovementioned training or qualification to mount, install and, if required, service this product. This restriction does not extend to possible operating instructions.
The installation of Viega products must take place in accordance with the general rules of engineering and the Viega instructions for use.
About this translated version
This instruction for use contains important information about the choice of product or system, assembly and commissioning as well as intended use and, if required, maintenance measures. The information about the products, their properties and application technology are based on the current standards in Europe (e. g. EN) and/or in Germany (e. g. DIN/DVGW).
Some passages in the text may refer to technical codes in Europe/Germany. These should serve as recommendations in the absence of corresponding national regulations. The pertinent national laws, standards, regulations and guidelines, as well as other technical guidelines, have priority over German/European guidelines in this manual: The information is not binding for other countries and territories and should, as mentioned, be considered as support.
Other applicable documents
This instruction for use describes the mounting of an extension piece for an Advantix Vario shower channel in rough steps.

INFO!
The instructions for use of the Advantix Vario shower channel must also be strictly observed for the mounting of the extension piece.
Product description
end closing piece

Instead of the closing cap, a so-called "end closing piece" can be mounted onto the base unit. The base unit can therefore be extended accordingly.

- a - max. 1451 mm
- b - max. 1680 mm
- c - max. 2651 mm
- d - max. 2880 mm
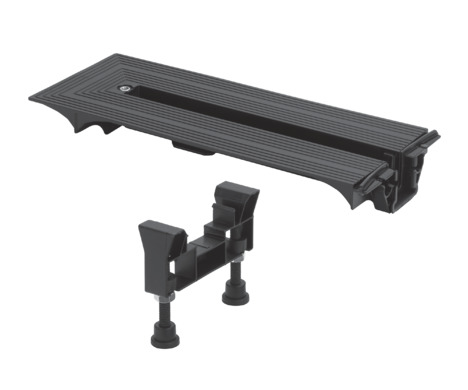
Overview of the components

- 1 - protective insert made of hard foam
- 2 - protective foil
- 3 - end closing piece
- 4 - Allen key size 4
- 5 - sealing tape
- 6 - foot, height-adjustable
- 7 - fixing material
- 8 - screws
- 9 - spacer
Required accessories

Per installed component one corresponding standing grate set is required. The complete range and the required information can be found in the catalogue.
Handling
Assembly information
Tools and materials
You require
Screwdriver
Allen key size 4
Mounting adhesive
Mounting adhesive can be used for a maximum of 18 months.

The filling date is found on the top edge of the cartridge. The first two numbers represent the month, the following number the year.
Example
0317...
Filling date = March (03) 2011 (1)
Installation dimensions

Assembly
Mounting the end closing piece

INFO!
Do not shorten end closing piece!

-
Screw the end closing piece onto the profile.
When using a cordless screwdriver, make the last few turns by hand.
Only tighten screws hand-tight!

-
The end closing piece is properly mounted when the seal is pushed together gently.
Mount adjustable feet, see instructions for use of the Advantix Vario shower channel.
Aligning the end closing piece

-
Align the shower channel and connection piece horizontally to one another.

-
Insert spacer.
The spacers prevent the channel from being deformed when the screed hardens.
Preparing for further work

-
If necessary, shorten the protective foil and stick onto the flange.
-
Line shower channel with screed (also see instructions for use of the shower channel).
-
Leave screed to harden.

-
Remove protective foil (1).
-
Remove spacer (2).
-
If necessary, clean the flange, e. g. with isopropanol.
-
Cut protective insert to size and insert (3).
-
Apply mounting and spread mounting adhesive (also see instructions for use of the shower channel).
-
Apply liquid foil (also see instructions for use of the shower channel).
-
Cut the sealing tape generously.

-
Position the sealing tape on the flange so that the flange and screed are uniformly covered.
Overlap the corners in the process.
-
Rework the sticking points with a roller.
Further processing see instructions for use of the shower channel.
Disposal
Separate the product and packaging materials (e. g. paper, metal, plastic or non-ferrous metals) and dispose of in accordance with valid national legal requirements.