Profipress G XL
Product information
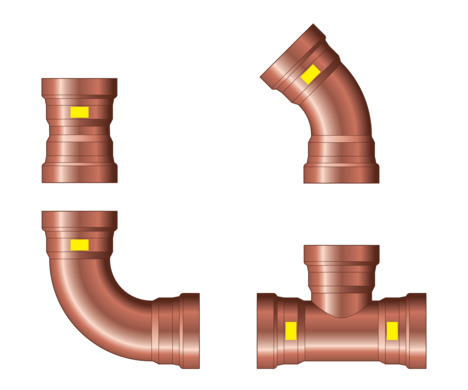
Profipress G XL
Press connector system made of copper for copper pipes
| Year built (from): | 12.08.2005. |
Trade mark rights exist for this document; for further information, go to viega.com/legal .
Target groups
The information in this instruction manual is directed at the following groups of people:
Contract installers
Professional companies specialising in the construction, maintenance and alteration of a natural or liquid gas system
Liquid gas systems may only be constructed, maintained or altered by companies that have the necessary qualification and experience.
Individuals without the abovementioned training or qualification are not permitted to mount, install and, if required, maintain this product. This restriction does not extend to possible operating instructions.
The installation of Viega products must take place in accordance with the general rules of engineering and the Viega instructions for use.
Labelling of notes
Warning and advisory texts are set aside from the remainder of the text and are labelled with the relevant pictographs.

DANGER!
This symbol warns of possible life-threatening injury.

WARNING!
This symbol warns of possible serious injury.

CAUTION!
This symbol warns of possible injury.

NOTICE!
This symbol warns of possible damage to property.

INFO!
This symbol gives additional information and hints.
About this translated version
This instruction for use contains important information about the choice of product or system, assembly and commissioning as well as intended use and, if required, maintenance measures. The information about the products, their properties and application technology are based on the current standards in Europe (e.g. EN) and/or in Germany (e.g. DIN/DVGW).
Some passages in the text may refer to technical codes in Europe/Germany. These should serve as recommendations in the absence of corresponding national regulations. The relevant national laws, standards, regulations, directives and other technical provisions take priority over the German/European directives specified in this manual: The information herein is not binding for other countries and regions; as said above, they should be understood as a recommendation.
Standards and regulations
The following standards and regulations apply to Germany / Europe and are provided as a support feature.
Regulations from section: Application areas
Scope / Notice | Regulations applicable in Germany |
|---|---|
Planning, execution, modification and operation of gas installations | DVGW-TRGI 2018 |
Gas installations for industrial, commercial and process plants | DVGW-Arbeitsblatt G 5614 |
Gas installations for industrial, commercial and process plants | DVGW-Arbeitsblatt G 462 |
Gas installations for industrial, commercial and process plants | DVGW-Arbeitsblatt G 459‑1 |
Gas installations for industrial, commercial and process plants | DVGW-Fachinformation Nr. 10 |
Planning, execution, modification and operation of liquid gas installations | DVFG-TRF 2021 |
Regulations from section: Media
Scope / Notice | Regulations applicable in Germany |
|---|---|
Suitability for gases Liquid gas in the gaseous state | DVGW-Arbeitsblatt G 260 |
Regulations from section: Pipes
Scope / Notice | Regulations applicable in Germany |
|---|---|
Rules of the fixing technology for gas installations | DVGW-TRGI 2018, Point 5.3.7 |
Rules of the fixing technology for gas installations | DVFG-TRF 2021, Point 7.3.6 |
Approval of press connectors for use with copper pipes | DVGW G 5614 |
Approval of press connectors for use with copper pipes | DIN EN 1057 |
Approval of press connectors for use with copper pipes | DVGW-Arbeitsblatt GW 392 |
Regulations from section: Corrosion
Scope / Notice | Regulations applicable in Germany |
|---|---|
(Subsequent) corrosion protection for underground installation | DIN 30672 |
Corrosion protection for external pipes | DVGW-TRGI 2018, Point 5.2.7.1 |
Corrosion protection for internal pipelines | DVGW-TRGI 2018, Point 5.2.7.2 |
Corrosion protection for external pipes | DVFG-TRF 2021, Point 7.2.7.1 |
Corrosion protection for internal pipelines | DVFG-TRF 2021, Point 7.2.7.2 |
Overground pipelines in recesses in the bare floor or levelling layer | DVGW-TRGI 2018, Point 5.3.7.8.4 |
Regulations from section: Storage
Scope / Notice | Regulations applicable in Germany |
|---|---|
Requirements for material storage | DIN EN 806‑4, Chapter 4.2 |
Regulations from section: Notes on mounting
Scope / Notice | Regulations applicable in Germany |
|---|---|
The general rules of mounting for gas installations | DVGW-TRGI 2018, Point 5.3.7 |
The general rules of mounting for gas installations | DVFG-TRF 2021, Point 7.3.6 |
Regulations from section: Establishing a flange connection
Scope / Notice | Regulations applicable in Germany |
|---|---|
Qualification of personnel for the assembly of flange connections | VDI-Richtlinie 2290 |
Determination of tightening torques | DIN EN 1591‑1 |
Regulations from section: Leakage test
Scope / Notice | Regulations applicable in Germany |
|---|---|
Leakage test for gas installations | DVGW-TRGI 2018, Point 5.6 |
Testing and initial commissioning of a liquid gas system | DVFG-TRF 2021, Point 8 |
Regulations from section: Maintenance
Scope / Notice | Regulations applicable in Germany |
|---|---|
Ensuring and maintaining a safe operating condition of gas installations | DVGW-TRGI 2018, Appendix 5c |
Intended use

INFO!
Agree the use of the system for areas of application and media other than those described with Viega.
Areas of application
Use is possible in the following areas among others:
Gas installations, see Regulations from section: Application areas
Liquid gas installations, also see Regulations from section: Application areas .
Compressed air systems
Gas installation
For planning, execution, modification and operation of gas installations, observe the applicable regulations, see Regulations from section: Application areas .
Use is possible in the gas installations described below:
Gas installations
Low pressure range ≤ 100 hPa (100 mbar)
Medium pressure range from 100 hPa (100 mbar) up to 0.1 MPa (1 bar)
Industrial, commercial and technical processing systems with the corresponding directives and technical regulations up to 0.5 MPa (5 bar)
Liquid gas installations
With liquid gas tank in medium pressure range downstream of the pressure regulating valve, 1st level on the liquid gas tank > 100 hPa (100 mbar) up to a permitted operating pressure of 0.5 MPa (5 bar)
With liquid gas tank in the low pressure range ≤ 100 hPa (100 mbar) behind the pressure regulating valve, 2nd level
With liquid gas pressurised container (liquid gas bottles) < 16 kg
Behind the small bottle pressure regulating valve
With liquid gas tank (liquid gas bottle) ≥ 16 kg
Behind the large bottle pressure regulating device

INFO!
The Sanpress Inox G system must be used for liquid gas installations in areas with requirements of higher thermal resistance (HTR), with a response pressure of the SSV > 0.1 MPa (1 bar).
Media
The system is suitable for the following media, amongst others:
For the applicable directives, see Regulations from section: Media .
Gases
Liquid gases, only in the gaseous state for domestic and commercial applications
Compressed air
Product description
Overview
The piping system consists of press connectors for copper pipes and the corresponding press tools.
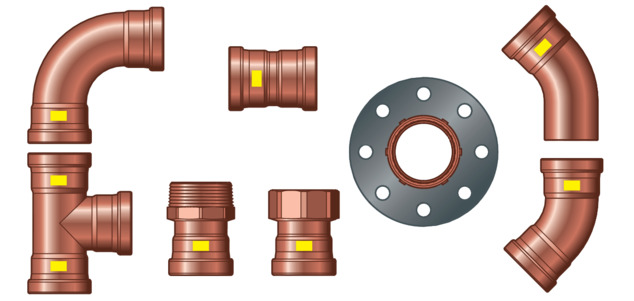
The system components are available in the following dimension: d 64.
Pipes
Profipress G XL press connectors are tested and certified with the following copper pipes, see Regulations from section: Pipes :
Thinner walls than stated are not permitted.
d x s [mm] |
|---|
64.0 x 2.0 |
Volume per metre of pipe [l/m] | Pipe weight [kg/m] |
|---|---|
2.83 | 3.47 |
Laying and fixing pipes
Observe the general rules of fixing technology:
For gas installations, see Standards and regulations .
Only fix on components with sufficient stability.
Gas supply lines must not be secured to other pipelines nor should they be used as support for other pipelines.
The system can be secured using commercially available plastic dowels together with non-flammable pipe clamps (e.g. metallic pipe clamps).
With gas supply lines, observe the following fixing intervals for pipelines laid horizontally:
Distance between the pipe clamps
d [mm] | Fixing distance between |
|---|---|
64.0 | 4.00 |
66.7 |
Press connectors
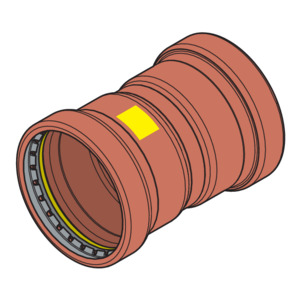
On Profipress G XL press connectors, there is a cutting ring, a separator ring and a sealing element in the bead of the press connector. The cutting ring cuts into the pipe during pressing and ensures a force-fit connection.
During installation, and later during the pressing, the separator ring protects the sealing element from damage from the cutting ring.
SC‑Contur
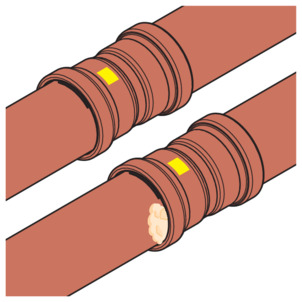
Viega press connectors are equipped with the SC‑Contur. The SC‑Contur is a safety technology that is certified by the DVGW and ensures that the press connector is guaranteed to be leaky in an unpressed state. In this way, inadvertently unpressed connections are noticed during a leakage test.
Viega guarantees that unpressed connections become visible during a leakage test:
with dry leakage test in the pressure range from 22 hPa–0.3 MPa (22 mbar–3.0 bar)
Sealing elements
Use |
|---|
Operating temperature |
Operating pressure |
Gas installation | Liquid gas installation | Heating oil and diesel pipelines |
|---|---|---|
-20 °C up to 70 °C | -20 °C up to 70 °C | ≤ 40 °C |
≤ 0.5 MPa (5 bar) (MOP 5) ≤ 0.1 MPa (1 bar) (HTR / GT1)2) | ≤ 0.5 MPa (5 bar) (MOP 5)1) ≤ 0.1 MPa (1 bar) (HTR / GT1)2) | ≤ 0.5 MPa (5 bar) |
| 1) | The maximum pressure equates to the pick-up pressure of the SSV in the pressure regulating valve. |
| 2) | GT1: Operating pressure at HTR requirement 650 °C / 30 min max. 0.1 MPa (1 bar) |
Markings on components
Markings on press connectors

The press connectors are marked as follows:
Yellow rectangle for gas
Gas for gas supply lines
MOP5 for maximum operating pressure 0.5 MPa (5 bar)
GT1 for operating pressure with HTR requirement 0.1 MPa (1 bar)
DVGW
Information for use
Corrosion
Depending on the area of use, corrosion protection measures may have to be taken into account. One differentiates between external pipelines (underground and overground external pipelines), as well as internal pipelines.
Information about the area of use, also see Areas of application .
The pertinent guidelines must be observed for corrosion protection, see Regulations from section: Corrosion .
Overground pipes and fittings in rooms do not normally require external corrosion protection.
There are exceptions in the following cases:
There is contact with aggressive building materials such as materials containing nitrite or ammonium.
in aggressive surroundings
In recesses within bare floors or in the compensating layer, they must be treated in the same way as buried external pipelines, see Regulations from section: Corrosion .
Handling
Transport
Observe the following when transporting pipes:
Do not pull the pipes over the sill. The surface could be damaged.
Secure pipes during transportation. Pipes may become bent due to shifting.
Do not damage the protective caps on the pipe ends and do not remove them until immediately before mounting. Damaged pipe ends must not be pressed.

INFO!
In addition, observe the instructions provided by the pipe manufacturer.
Storage
For storage, comply with the requirements specified in the applicable regulations, see Regulations from section: Storage :
Store components in a clean and dry place.
Do not store the components directly on the floor.
Provide at least three points of support for the storage of pipes.
Where possible, store different sizes separately.
Store small sizes on top of larger sizes if separate storage is not possible.

INFO!
In addition, observe the instructions provided by the pipe manufacturer.
Assembly information
Mounting instructions
Checking system components
System components may, in some cases, have become damaged through transportation and storage.
Check all parts.
Replace damaged components.
Do not repair damaged components.
Contaminated components may not be installed.
The system is intended for underground device connection pipelines for gas devices for use outside. Press connectors are not permitted in underground liquid gas pipelines.
For gas installations, observe the applicable regulations, see Regulations from section: Notes on mounting .

NOTICE!
Active and possibly passive protection measures are required to protect a gas installation from tampering by unauthorised persons, see Regulations from section: Notes on mounting .
Active protective measures (e. g. gas flow monitor) must always be taken.
Passive protective measures (e.g. gas safety plugs and caps) must be selected and employed depending on the installation.
The general rules of mounting for gas supply lines
The following conditions amongst others are valid when laying gas supply lines:
Lay gas supply lines with clearance from the installation body, concealed without hollow spaces, or in ventilated ducts or shafts.
Do not install gas supply lines with operating pressures > 100 hPa (100 mbar) concealed in the wall.
Arrange gas supply lines in such a way that condense water or water dripping from other pipes and components does not affect them.
Do not lay gas supply lines in screed.
Shut-off systems and detachable connections must be easily accessible.
Requirements on concealed installations:
Lay stress-free.
Apply corrosion protection.
Do not use any detachable connections (screw fittings).
Do not use copper pipes together with materials containing nitrite or ammonium.

NOTICE!
If it is necessary to seal a thread with sealing hemp during assembly, roughen the thread flanks e.g. with a saw blade without damaging them to prevent the sealant from being pushed out.

INFO!
Continuous, connection-free gas supply lines may be laid in hollow spaces (pre-wall constructions) to be connected to a gas device or a gas socket.
Ventilation is not required.

NOTICE!
Protect the cutting ring from the weather in vertical outdoor installations.
Space requirements and intervals
Pressing between pipelines
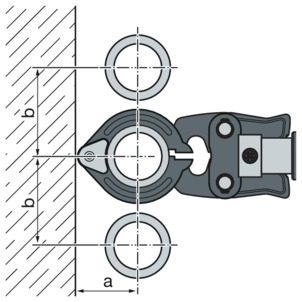
d |
|---|
a [mm] |
b [mm] |
64.0 |
|---|
110 |
185 |
Pressing between pipe and wall
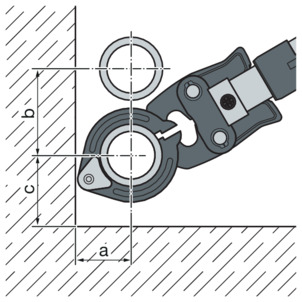
d |
|---|
a [mm] |
b [mm] |
c [mm] |
64.0 |
|---|
110 |
185 |
130 |
Distance to walls
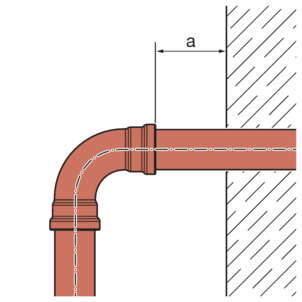
d |
|---|
Minimum interval amin [mm] |
64.0 |
|---|
20 |
Interval between the pressings

NOTICE!
Leaking press connections due to pipes being too short
If two press connectors are to be mounted next to one another onto a pipe without an interval, the pipe must not be too short. If the pipe is not inserted up to the prescribed insertion depth in the press connector during pressing, the connection may leak.
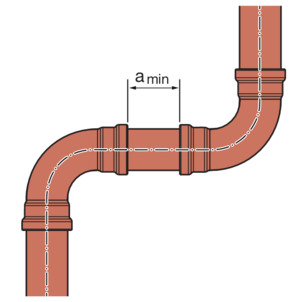
d |
|---|
Minimum distance a [mm] |
64.0 |
|---|
15 |
Z dimensions
For the Z dimensions, refer to the respective product page in the online catalogue.
Required tools
The following tools are required for production of a press connection:
Pipe cutter or a fine-toothed hacksaw
Deburrer and coloured pen for marking
press machine with constant pressing force of 32 kN
Press ring with corresponding hinged adapter jaw, suitable for the pipe diameter and with suitable profile
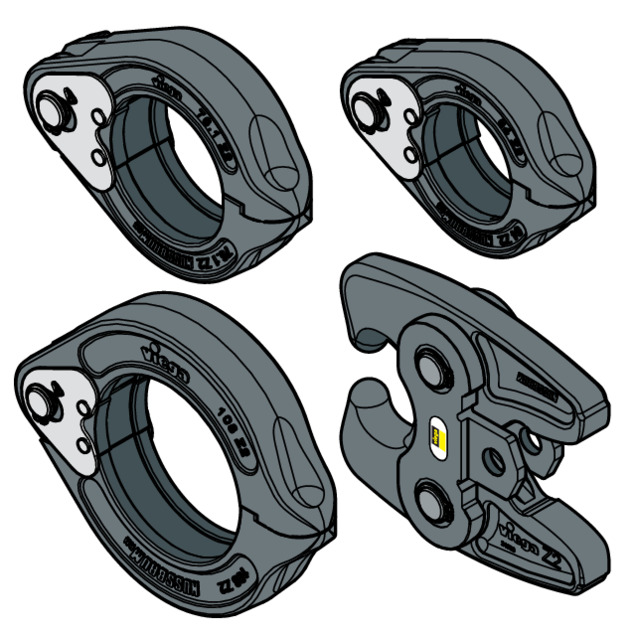

INFO!
Viega recommends the use of Viega system tools when installing the press fittings.
The Viega system press tools have been developed and tailored specifically for the installation of Viega press connector systems.
Assembly
Shortening the pipes

NOTICE!
Leaking press connections due to damaged material!
Press connections can become leaky due to damaged pipes or sealing elements.
Observe the following instructions to avoid damage to pipes and sealing elements:
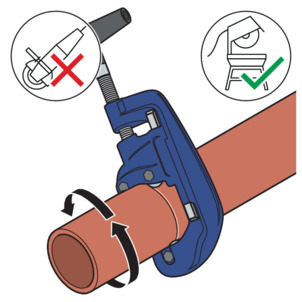
Do not use cutting discs (angle grinders) or flame cutters when cutting to length.
Do not use grease or oils (e. g. cutting oil).
For information about tools, also see Required tools .
-
Cut the pipe at a right angle using a pipe cutter or fine-toothed hacksaw.
Avoid grooves on the pipe surface.
Deburring the pipes
The pipe ends must be thoroughly deburred internally and externally after shortening.
Deburring prevents the sealing element being damaged or the that the press connector cants when mounted. Viega recommends using a deburrer (model 2292.4XL).

NOTICE!
Damage due to the wrong tool!
Do not use sanding disks or similar tools when deburring. The pipes could be damaged by these.

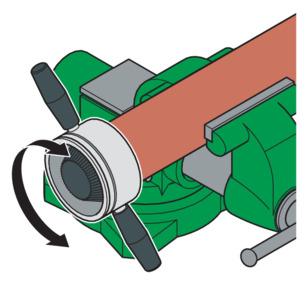
-
Secure the pipe in the vice.
-
When clamping, leave an interval of at least 100 mm (a) to the pipe end.
The pipe ends must not be bent or damaged.
-
Deburr the inside and outside of the pipe.
Pressing the connection
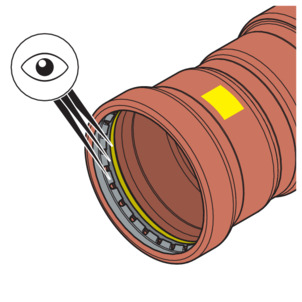
Requirements:
The pipe end is not bent or damaged.
The pipe is deburred.
The correct sealing element is in the press connector.
HNBR = yellow
Sealing element, separator ring and cutting ring are undamaged.
The complete sealing element, separator ring and cutting ring are in the bead.
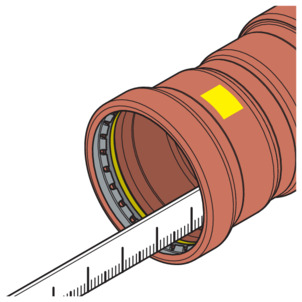
-
Measure the insertion depth in the press connector.
d [mm]
Insertion depth [mm]
64.0
43
-
Mark the insertion depth on the pipe.
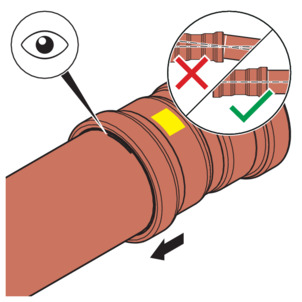
-
Push the press connector up to the marked insertion depth on the pipe. Do not twist the press connector.
-
Place the hinged adapter jaw onto the press machine and push the retaining bolt in until it clicks into place.
INFO!Observe the press tool instruction manual.
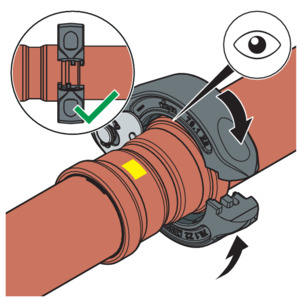
-
Place the press ring onto the press connector. The press ring must completely cover the outside ring of the press connector.
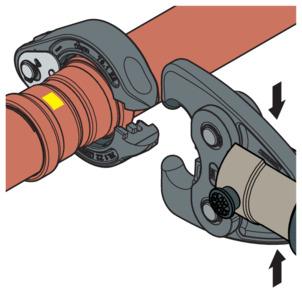
-
Open the hinged adapter jaw.
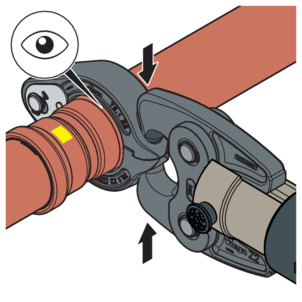
-
Position the hinged adapter jaw into the seat of the press ring.
-
Carry out the pressing process.
-
Open the hinged adapter jaw and remove the press ring.

-
Remove the checking strip.
-
The connection is marked as having been pressed.
Flange connections
In the press connector system shown, flange connections in size 64.0 mm are possible.
The assembly of flange connections may only be carried out by qualified personnel. Personnel can be qualified to assemble flange connections on the basis of applicable directives, for example; see Regulations from section: Establishing a flange connection .
A corresponding training section on proper flange connection assembly in vocational training (of staff/specialist personnel) with qualified completion as well as successful regular application are considered as sufficient proof.
Other employees without the appropriate technical training (e.g. operating personnel) who are to install flange connections must be provided with technical knowledge through training measures (theoretical and practical); this must be documented.
washers
The advantages of using hardened washers are:
Defined friction surface during assembly.
Defined roughness in calculation and thus reduction of the scattering of the tightening torque, whereby a greater screw force can be achieved mathematically.
Flange types
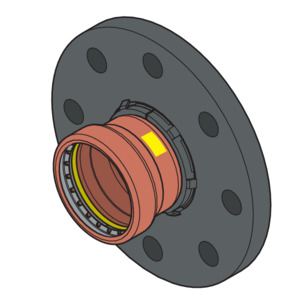
loose flange
Steel, black, powder-coated
Copper press connection
Model 2659.5XL: 64 mm
Establishing a flange connection

INFO!
Always make the flange connection first and then the press connection.
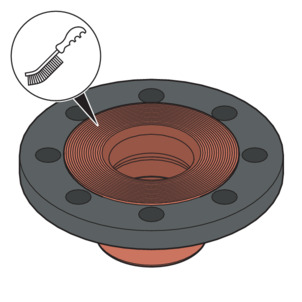
-
If necessary, remove any temporary coatings on the flange sealing surfaces without leaving any residue before assembly, using cleaning agents and a suitable wire brush.
NOTICE!When replacing seals, make sure to remove the old seal completely from the flange sealing surface without damaging the flange sealing surface.
-
Ensure that the flange sealing surfaces are clean, undamaged and even. In particular, there must not be any radial surface damage such as grooves or impact marks.
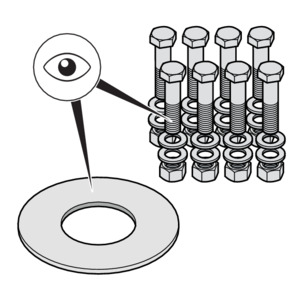
-
The screws, nuts and washers must be clean and undamaged and comply with the specifications for minimum bolt length and strength class, see Required tightening torques .
-
During disassembly, replace removed screws, nuts and washers with new ones if damaged.
-
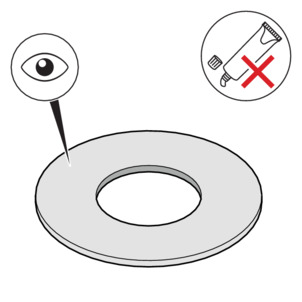
The seal must be clean, undamaged and dry. Do not use adhesives and assembly pastes for seals.
-
Do not reuse used seals.
-
Do not use seals with kinks as they pose a safety risk.
-
Ensure that seals are free from faults and defects and that the manufacturer's specifications are complied with.
-
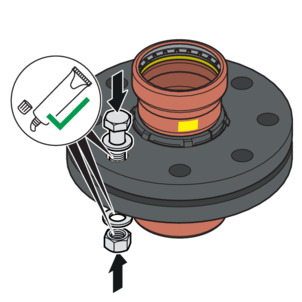
Lubricate the following flange elements with suitable lubricant:
Screw thread
Washer
Nut support
NOTICE!Observe the manufacturer's information on the application and temperature range of the lubricant.
Install and centre the sealing element
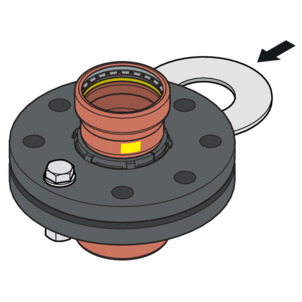
The correct assembly of flange connections requires parallel aligned flange blades without an offset centre that allow the sealing element to be inserted in the correct position without damage.
-
Press the sealing surfaces far enough apart so that the seal can be inserted without force and without damage.
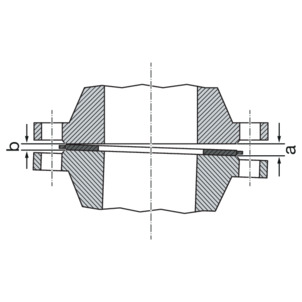
The gap (out-of-parallelism of the sealing surfaces) before tightening the screws is not critical if the permissible gap is not exceeded.
DN | Permissible gap a-b [mm] |
|---|---|
65 | 0.6 |
-
Remove the gap from the gaping side (a).
-
In case of doubt, tighten the flanges without inserting a seal by tightening the screws to achieve parallelism and sealing surface distance of approx. 10% of the nominal torque.
-
The gap is not permissible if the flange position cannot be achieved without great effort.
Systematics for tightening screws
The order in which the screws and nuts are tightened has a significant influence on the force distribution acting on the seal (surface pressure). Incorrect tightening leads to a high dispersion of the pretensioning forces and can result in the required minimum surface pressure not being reached and even in leaks.
After tightening the nut, at least two but no more than five threads should protrude from the end of the screw.
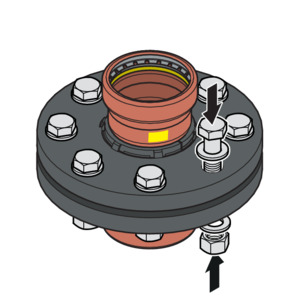
-
Prepare the screws by hand, observing the following:
Install the screws so that all screw heads are on one flange side.
For horizontally arranged flanges, insert the screws from above.
Replace sluggish screws with smooth-running ones.
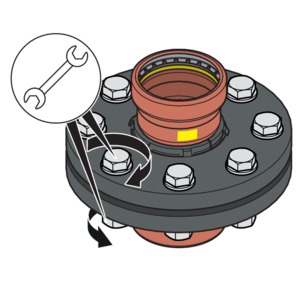
-
The simultaneous use of several tightening tools is possible.
Suit order
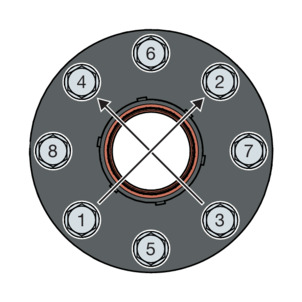
-
Tighten all screws crosswise with 30% of the nominal tightening torque.
-
Tighten all screws as in step 1 to 60% of the nominal tightening torque.
-
Tighten all screws as in step 1 to 100% of the nominal tightening torque.
-
Tighten all screws again with the full nominal tightening torque. Repeat this process until the nuts can no longer be turned when the full tightening torque is applied.
Required tightening torques
Tightening torques Profipress G XL flange adapters
Model | DN | Article number | Thread | Tightening torque [Nm] | Screw length [mm] | Strength class |
|---|---|---|---|---|---|---|
2659.5XL | 65 | 577 971 | M16 | 125 | 70 | 8.8 |
Disconnecting the flange adapter
Before starting to disassemble an existing flange connection, get approval and a work permit from the responsible company, if necessary, observing the following:
The system section must be depressurised and completely flushed.
Secure built-in or attached parts that are not held separately before loosening the flange connection. This also applies to fastening systems such as spring hangers and supports.
Start loosening screws or nuts on the side facing away from the body, loosen the remaining bolts slightly and only disassemble completely when you have ensured that the piping system does not present a risk. If a pipeline is under tension, there is a risk of the pipeline rupturing.
Loosen the screws or nuts crosswise in at least two passes.
Close open ends of strands with dummy plugs.
Transport disassembled pipelines only in closed condition.
When replacing seals, make sure to remove the old seal completely from the flange sealing surface without damaging the flange sealing surface.

NOTICE!
Caution when using an angle grinder!
When loosening defective screws and nuts with the help of an angle grinder, sparks are produced that can burn into the pipe material and cause corrosion.
Leakage test
The installer must perform a leakage test before commissioning.
Carry out this test on a system that is finished but not covered.
Observe the applicable regulations, see Regulations from section: Leakage test .
Document the result.
Maintenance
The gas installation must be given a visual inspection, e. g. by the owner, once a year.
Serviceability and leak tightness must be checked every twelve years by an installation contractor.
To be covered by the warranty and to ensure the safe operation of the gas installations, operate and maintain them as intended, see Regulations from section: Maintenance .
Disposal
Separate the product and packaging materials (e. g. paper, metal, plastic or non-ferrous metals) and dispose of in accordance with valid national legal requirements.